

by Bill Cooke
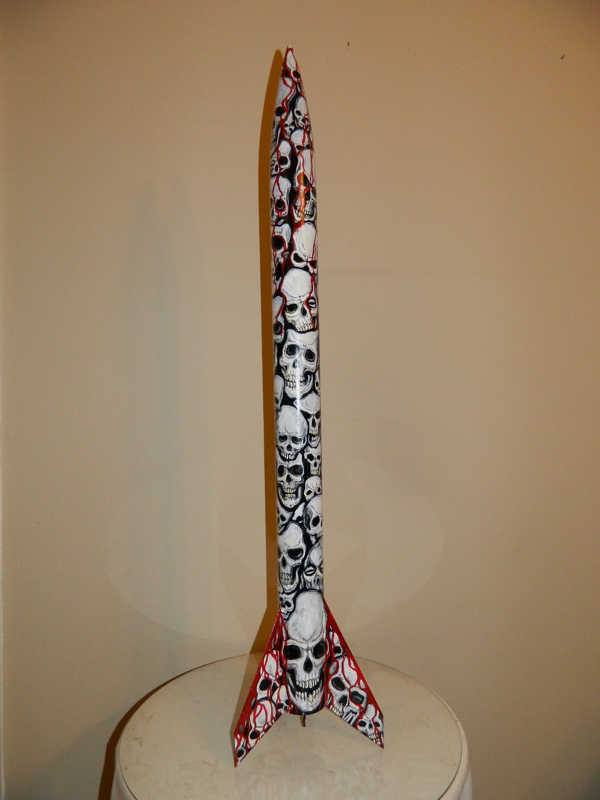
Estes Executioner built and painted by Kimble29 on Ye Olde Rocket Forum
Now that the primer has been applied, we can move on to the paint. The type of paint is the rocketeer’s choice, with many choosing Rustoleum spray, while others use the same Testors enamels used to paint model cars or planes. The more artistic among us will break out the air brush, producing magnificent finishes like that on the Executioner seen at right. Whatever your paint choice, be sure you read the directions on the can or bottle, and follow them – a lot of weeping and gnashing of teeth can be saved by knowing the drying and recoat time of your paint.
Also, it is important to avoid mixing paint brands or types, as this can lead to “crazing”, in which incompatibilities in the chemistry of the paints cause huge cracks and wrinkles in the finish. However, there may be times – usually due to the unavailability of a certain color – when you have to mix brands or types. In these cases, remember that enamels can be applied over lacquer-based paints such as Rustoleum or Krylon, but lacquers cannot be applied over enamels. Similarly, fluorescent paints should be the last coat, as they will craze any type of paint applied over them (I know this from bitter experience). When mixing different brands, such as Rustoleum and Krylon, the best thing to do is to test out the application on a unpainted scrap piece of body tube. Spray the paint on in the order you intend to use with the model, and see if there are any issues. If nothing materializes, you are good to go.
When working outdoors or in an open garage, be mindful of the wind and humidity. The wind part is obvious – you don’t want paint going everywhere and creating a spotty finish on the rocket. Avoid spraying when the humidity is higher than 50%, as this will lead to the paint dulling or “blushing” (areas where the paint appears duller than its surroundings). Here in the South, we have constant high humidity, but it usually drops below 50% between 2 and 4 in the afternoons, providing a couple of hours suitable for painting.
When painting, spray continous light coats down the entire rocket – don’t “spot paint”, as this will create an uneven finish (which means sanding) and don’t lay it on too thick, as this will cause the paint to run. With Krylon, I usually hold the spray can about 10 to 12 inches from the rocket; this same distance should be about right for Rustoleum and other sprays. Start with the lightest color first and then move on to successively darker colors, saving black for last – be sure to allow the right amount of drying time between coats! No matter what the paint scheme, I always apply a coat of gloss or semi-gloss white above the gray primer to serve as a base coat, as applying yellows or other light colors directly on top of the primer results in very dark versions of these colors. White is always a good place to start.
As I mentioned in an earlier post, I use Tamiya masking type to mask off areas of the rocket when painting. You can avoid bleeds and smudges by
- Burnish down the edges of the tape with your finger – make sure the rocket surface is smooth and that the tape has good contact, else you will get bleeds.
- It is a good idea to apply another light coat of the prior color, as this will create a “seal” on the tape edge, also avoiding bleeds. If you use Scotch tape for masking, this is a must.
- Be SURE you have covered/masked the areas of the rocket that are not supposed to receive the paint – you would be surprised to find how easily that fin color can find a way to get on to your nice white body tube. Black is particularly evil in doing this.
- Remove the masking tape as soon as the paint can be touched – if you wait until it is fully dry, you run the risk of the paint chipping when you remove the tape. Pull the tape straight up when removing it.
- Use 1000/2000 grit sandpaper to smooth out rough areas and imperfections between coats.
- Above all, be patient! Wait for the right conditions and take your time.
Here are the Rogue and Aero-Hi after painting – note the nice sharp lines. I am reasonably pleased with how these turned out, so we are now ready for the final step – applying the decals, which will be covered in Part 7.