

 I’m always looking for some new way to build a rocket to make assembly in the field easier and this is a cool and very easy way to replace nylon rivets. The first method I tried to leave rivets behind was to epoxy an ordinary hex nut on the inside of the fiberglass airframe. That would work okay if for not a few reasons. One, I always got epoxy on the threads and that gummed up the threads. Two, it was hard to align the hex nut if I didn’t have the screw fed through the hole to keep the hex nut in place. And three, my elbow isn’t calibrated very well sometimes so I tend to over torque the screws and the hex nut breaks free from the epoxy. I really liked the idea of having stainless steel screws with shear strengths up in the hundreds of pounds range in place of my old expendable nylon rivets that I never had enough of or in the right size when I was in the field.
There are a few simple principles that I apply in all of my rocket builds. I like to look for what I call “the elegant solution”. That is the solution that is simplistic in its application, and usually solves several issues at once. Also, I look for commonality of fasteners, hardware, components, and tools. Reducing the part count of my rockets mean that I can have less hardware and fewer tools in my field box and I can still solve problems that might arise. Having said all of that, I am going to tell you about my elegant solution for securing sections of my rockets together.
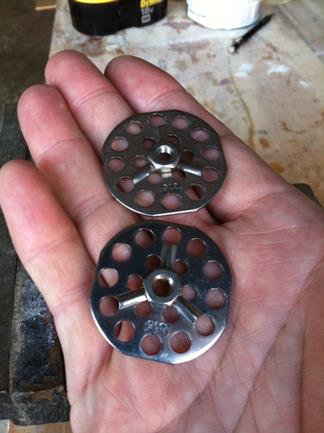
I use McMaster-Carr for almost all of my piecewise part needs at work. Its super-fast and fairly priced for the convenience of finding really every fastener, tool, and raw material known to mankind in once place that can be at your door in under 24 hours. Once, I ordered the wrong thread type on a screw and call customer service to correct my mistake. It had only been 15 minutes from when I placed the order, and it was already on the truck. I digress. So, what I found was a weld nut plate with multiple drilled holes that allow glue or plastic to flow through. They are a bit expensive but after I tried these, I was sold.
The weld nut plate with its large bonding area distributes applied loads over a larger area than a plane hex nut or a rivet. The drilled holes let epoxy push up around the plate adding mechanical engagement as well as pure shear strength. The nut is welded to the plate so I don’t worry much about over torqueing the screw and breaking it free. But the airframe is contoured and the plate is flat, right? It is easy to bend it by hand in a bench vice to the shape of the airframe.
Bending the Weld Nut Plate
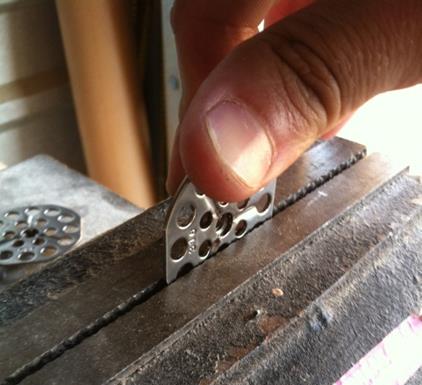 This was easy to do despite requiring some exertion to bend the stainless steel plate. I had a section of airframe on hand to gauge how much I needed to bend the plate. The plate will bend where it is pinched in the vice so I start from the middle and work my way outward. I lightly pinch the weld nut plate in the vice leaving enough of a gap between the hex nut its self and the top of the vice to allow me to bend the plate. Small moves are best. It’s easy to put the bend in but harder to take it out. The metal undergoes what is called “work hardening”, so the more you work it, the harder it becomes to get the bend out.
 Bend the plate a little then re-pinch it just a bit further down and bend it a bit more. Once you finish bending one side of the plate, turn it around and start again. Take care to make the bends symmetric. I use one of the three stamped ridges in the plate as a guide. I pick one and keep it horizontal for all the bends. Test fit the weld nut plate by laying it in the section of airframe you want to use. The nut plate will not be a perfect match, but you should be able to get about 3/4ths the plate to touch the airframe. Repeat these steps for all the nut plates that you intend to use.
Diatribe on Drill Bits
There is a step that I am going to skip, and that is detailing where to use nut plates. I have used them for rail buttons, installing avionics bays in airframe, etc. You should be able to assess your needs and if this technique is good for your application. Where I will pick up is with clearance holes.
It wasn’t until a few years ago that I learned a 1/4 inch screw doesn’t fit into a 1/4 inch hole. You have to use a bigger drill bit. But how big of a drill bit do I need? Someone else has done that work for you. There are all sorts of charts and tables out there. Just do an internet search for “tap clearance hole chart”. I’m using a #10-32 weld nut plate, so one chart tells me that I needed to use a #9 drill bit for a close fit or a #7 drill bit for a loose fit. Yeah, drill bits come in fractions, numbers, and letters. The number and letter system requires a decoding but you get a better range of sizes than fractional. Number and letter drill bits don’t overlap. Numbered bits are small than 0.230” and letters are bigger. Fractional drill bits have the size written on them, but they are in the form of an irreducible fraction which can be confusing. But since you probably won’t have those special types of drill bits, look for the decimal equivalent value and try to find a drill bit that is close to that. You may have to pull out the calipers if your drill bit collection is organized like mine. So let’s jump to bonding the weld nut plate.
Bonding the Weld Nut Plates
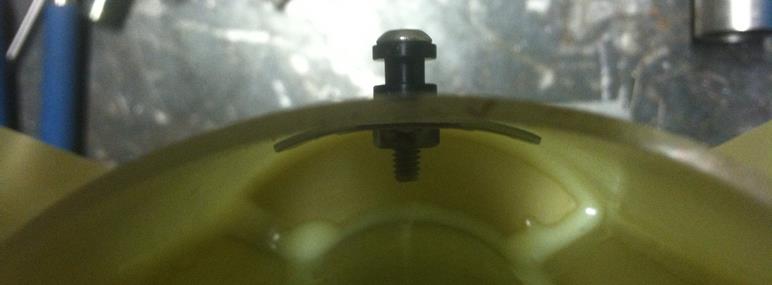
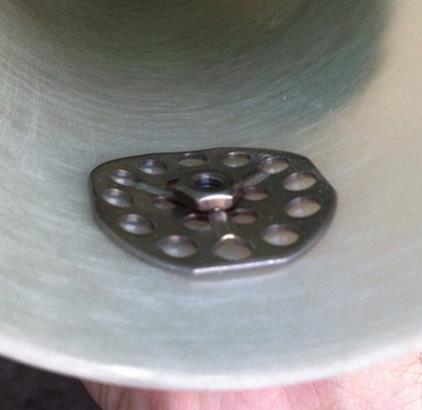
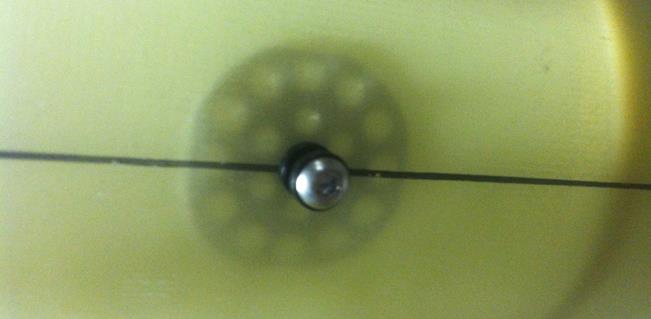
The hole is drilled and I have test fit my screw with a rail button on it, and everything looks like it fits well. If you can reach the nut plate with a pencil or marker while you have it test fitted, draw a circle around it so you know where to apply the epoxy. You will not need much epoxy to bond one weld nut plate inside the airframe. It is important that you be able to apply a liberal amount in the bonding area without getting any right at the hole you drilled. Epoxy directly around the hole may be pushed up into the hex nut so take care in this area.
Placing the nut plate directly into position is a bit tricky. If you lay it down and then slide it into place, you will drag the epoxy around too and likely push some up into the hex nut. I first stuck the screw up through the hole and threaded the weld nut plate on the screw before letting it come into contact with the epoxy. I then lowered the nut plate into place moving directly down and turning the screw to alight the contour of the nut plate with the contour of the airframe. I then tightened the screw once the nut plate was down to apply compression. I applied a bit more epoxy where needed all around the top of the nut plate and then set it aside to cure. Done!
How much you enjoy your launch experience begins early on when you are designing and building your rocket. Small decisions early on have lasting effects. This weld nut plate method has proved robust and simple. It is what I like to call “the elegant solution” to fastening rocket components together. I have used both #8-32 and #10-32 stainless steel nut plates. I recommend using one size throughout on you rocket builds. I determine which size to use based on which size rail buttons I plan to use. Small rail buttons typically use a #8 screw, and large rail buttons typically use #10 screws. Limiting your rocket to one size of fastener will cut down on the hardware and tools that you have to maintain in your field box and may make the difference between being a flyer or a spectator for the day.

Very cool! Thank you for sharing this.
Where did you locate the weld nut plates?
This is one of the best tips I have come across on any rocketry site. I use weld nuts on just about all my builds now, even down to 1010 rail buttons on small diameter HPR builds.
I was able to track back to the manufacturer from the McMaster Carr site and order the smaller size weld nuts with 8/32 threads for 1010 rail buttons to keep weight down.
Thanks for sharing!
I’ve had luck finding 6-32 weld nuts at Lowes in the furniture hardware drawers
Good to know!