Archive for How To

Names Needing Rockets

Often as a LCO I will get a flight card filled out with the rocket name given as ‘none’ or ‘blue rocket’ or some such empty unimaginative title. This should not be. There are many incredible unclaimed names for rockets that evoke adventure and excitement so that these blanks need never again be left craving a designation. Even the rocket beginner need only look to an Independence Day Celebration catalog or the aisle of heavy metal rock albums for inspiration. As a service to name the unnamed rockets we offer a sample listing here. Keep this list on the LCO table to complete those flight cards with style.


Lucifer’s Hammer

Torch of Freedom

Ninja Steel

Gravity Wins

Einstein’s Enigma

Zombie Apocalypse

Screaming Memaw

Jaw Dropper

Raging Ghoul Read more

How to Use Weld Nut Plates on Fiberglass Rockets

weldnut photo 6weldnut photo 2I’m always looking for some new way to build a rocket to make assembly in the field easier and this is a cool and very easy way to replace nylon rivets.  The first method I tried to leave rivets behind was to epoxy an ordinary hex nut on the inside of the fiberglass airframe. That would work okay if for not a few reasons. One, I always got epoxy on the threads and that gummed up the threads. Two, it was hard to align the hex nut if I didn’t have the screw fed through the hole to keep the hex nut in place. And three, my elbow isn’t calibrated very well sometimes so I tend to over torque the screws and the hex nut breaks free from the epoxy. I really liked the idea of having stainless steel screws with shear strengths up in the hundreds of pounds range in place of my old expendable nylon rivets that I never had enough of or in the right size when I was in the field. Read more

Building Rockets, Finale – Decals

By Bill Cooke

A lot of the new rockets come with “peel ‘n stick” stickers these days, rather than decals. Many rocketeers call these “peel ‘n cuss”, because they are not much fun to apply (especially roll patterns and long names) due to their stickiness – very little room to make a mistake. Read more

Building Rockets, Part 6 – Paint

by Bill Cooke

Image

Estes Executioner built and painted by Kimble29 on Ye Olde Rocket Forum

Now that the primer has been applied, we can move on to the paint. The type of paint is the rocketeer’s choice, with many choosing Rustoleum spray, while others use the same Testors enamels used to paint model cars or planes. The more artistic among us will break out the air brush, producing magnificent finishes like that on the Executioner seen at right. Whatever your paint choice, be sure you read the directions on the can or bottle, and follow them – a lot of weeping and gnashing of teeth can be saved by knowing the drying and recoat time of your paint.

Also, it is important to avoid mixing paint brands or types, as this can lead to “crazing”, in which incompatibilities in the chemistry of the paints cause huge cracks and wrinkles in the finish. However, there may be times – usually due to the unavailability of a certain color – when you have to mix brands or types. In these cases, remember that enamels can be applied over lacquer-based paints such as Rustoleum or Krylon, but lacquers cannot be applied over enamels. Similarly, fluorescent paints should be the last coat, as they will craze any type of paint applied over them (I know this from bitter experience). When mixing different brands, such as Rustoleum and Krylon, the best thing to do is to test out the application on a unpainted scrap piece of body tube. Spray the paint on in the order you intend to use with the model, and see if there are any issues. If nothing materializes, you are good to go.

When working outdoors or in an open garage, be mindful of the wind and humidity. The wind part is obvious – you don’t want paint going everywhere and creating a spotty finish on the rocket. Avoid spraying when the humidity is higher than 50%, as this will lead to the paint dulling or “blushing” (areas where the paint appears duller than its surroundings). Here in the South, we have constant high humidity, but it usually drops below 50% between 2 and 4 in the afternoons, providing a couple of hours suitable for painting.

When painting, spray continous light coats down the entire rocket – don’t “spot paint”, as this will create an uneven finish (which means sanding) and don’t lay it on too thick, as this will cause the paint to run. With Krylon, I usually hold the spray can about 10 to 12 inches from the rocket; this same distance should be about right for Rustoleum and other sprays. Start with the lightest color first and then move on to successively darker colors, saving black for last – be sure to allow the right amount of drying time between coats! No matter what the paint scheme, I always apply a coat of gloss or semi-gloss white above the gray primer to serve as a base coat, as applying yellows or other light colors directly on top of the primer results in very dark versions of these colors. White is always a good place to start.

As I mentioned in an earlier post, I use Tamiya masking type to mask off areas of the rocket when painting. You can avoid bleeds and smudges by

  • Burnish down the edges of the tape with your finger – make sure the rocket surface is smooth and that the tape has good contact, else you will get bleeds.
  • It is a good idea to apply another light coat of the prior color, as this will create a “seal” on the tape edge, also avoiding bleeds. If you use Scotch tape for masking, this is a must.
  • Be SURE you have covered/masked the areas of the rocket that are not supposed to receive the paint – you would be surprised to find how easily that fin color can find a way to get on to your nice white body tube. Black is particularly evil in doing this.
  • Remove the masking tape as soon as the paint can be touched – if you wait until it is fully dry, you run the risk of the paint chipping when you remove the tape. Pull the tape straight up when removing it.
  • Use 1000/2000 grit sandpaper to smooth out rough areas and imperfections between coats.
  • Above all, be patient! Wait for the right conditions and take your time.

Here are the Rogue and Aero-Hi after painting – note the nice sharp lines. I am reasonably pleased with how these turned out, so we are now ready for the final step – applying the decals, which will be covered in Part 7.

Building Rockets, Part 5 – Finishing and Primer

By Bill Cooke

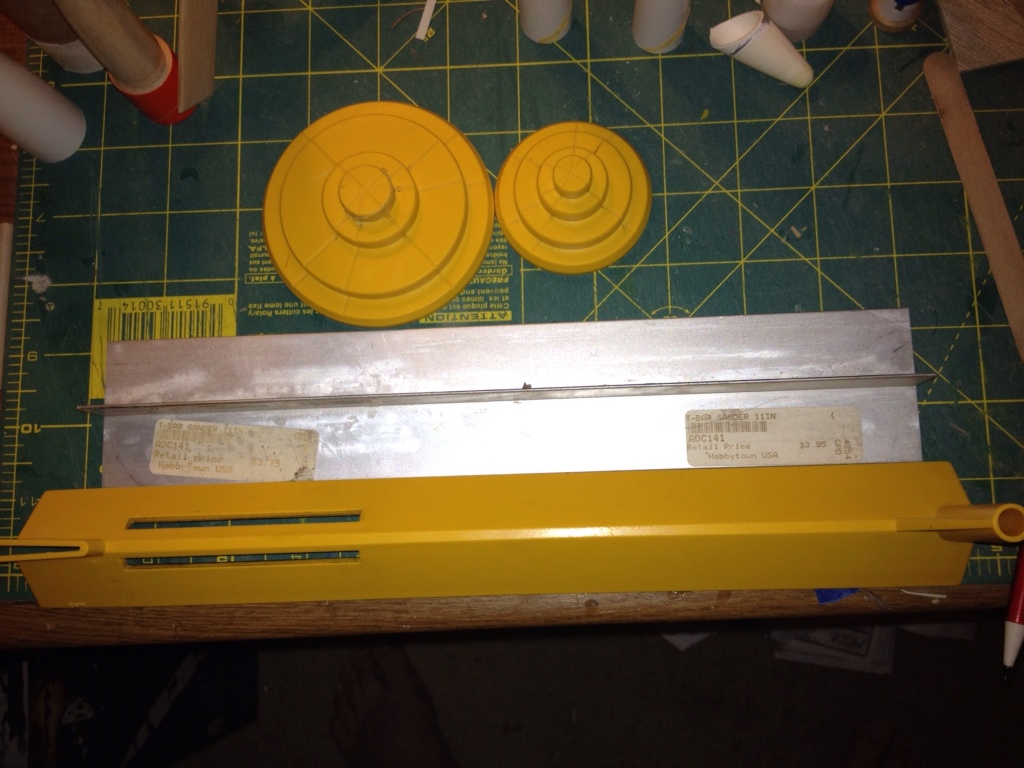
Here are 3 of the laminated fins for the Rogue before attachment. This picture is important, not so much due to the fins, but because of the makeshift tool just above them. Consisting of a strip of 400 grit sandpaper glued to a popsicle stick, it is very useful for sanding those small or hard-to-get-at areas of the rocket – in this case, the edges of the Rogue fins. You will often find yourself constructing such tools as you move on to harder, more elaborate builds or HPR; for example, I know quite a few rocketeers who glue sandpaper strips to dowels to help them sand smooth epoxy filets.

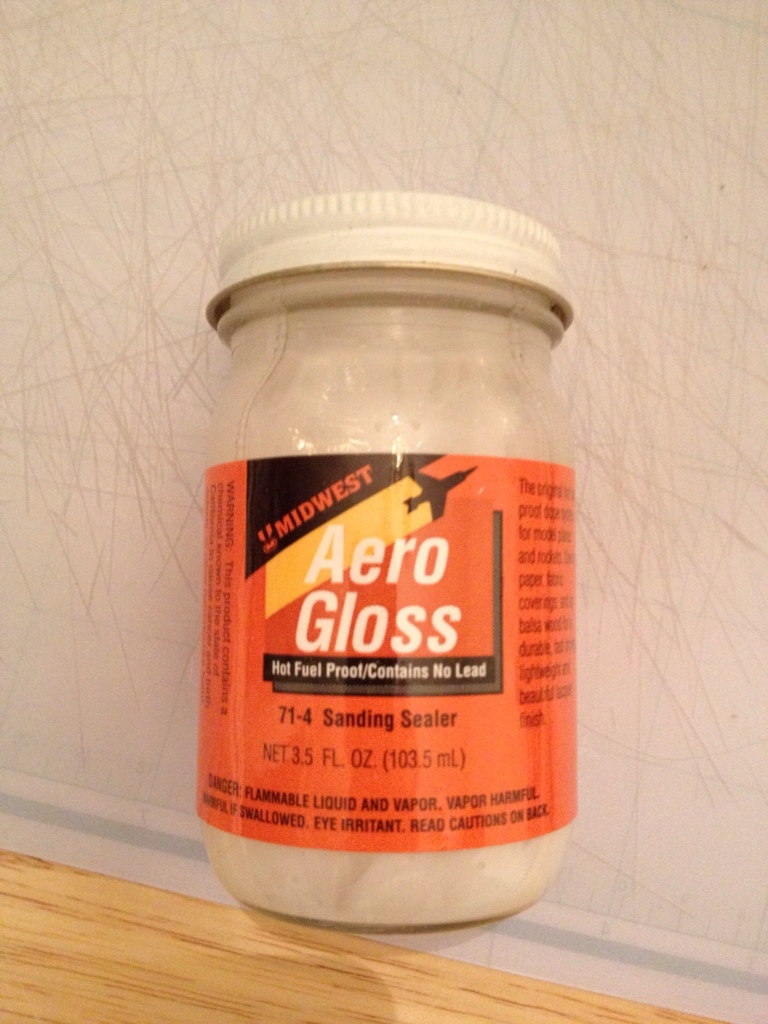
The Rogue fins and launch lug were attached to the rocket and filleted, just like the Aero Hi. After the glue dried, I applied sanding sealer to the balsa parts of both rockets to fill the balsa grain. There are a lot of different ways to do this, but no matter which mehod you choose, it will involve multiple coats and a fair amount of sanding. My technique is as follows:

  1. Go outside on the patio, or open the sliding glass doors to the work room. Aerogloss sanding sealer produces a lot of fumes, so you want to work in a well-ventilated area.
  2. Using the appropriate size brush (big for big fins, small for conduits, etc), apply a coat of sanding sealer. Wait 15 minutes then apply a second coat.
  3. Wait 45 minutes, sand with 320 grit sandpaper.
  4. Repeat step 2.
  5. Wait 45 minutes, sand with 400 grit sandpaper.

If you have sanded the sides of your fins before cutting or removing them from the balsa sheet, you should have a nice, glassy-smooth surface.  If not, apply another coat of sanding sealer, wait 45 minutes, and sand with 400 grit. Repeat until the grain is filled and the surface is smooth. Unless the balsa grain is deep, I usually find 4 coats is enough for fins; nose cones usually take 5.

After the sealer has dried overnight, you can then prime the rocket. Choice of primer varies from rocketeer to rocketeer – I use Krylon Industrial, again because it is forgiving, but others swear by Rustoleum, Valspar, or even Walmart brand (cheap, but it works). Some even try fill the grain and prime in one step by using Kilz sealer-primer. I tried this stuff once, when I built my Thrustline D-Region Tomahawk – it turned out to be Chuck Pierce’s worst nightmare, taking me 2 days to sand out all the bubbles to get a smooth finish. Plus, you could have probably buried me in all the dust that was produced.

Anyway, apply a coat of primer to the rocket, wait a few hours or a day or so (depending on drying time), and sand most of it off with 240/320 grit sandpaper. The pic below shows the bottom part of Rogue after this has been done.

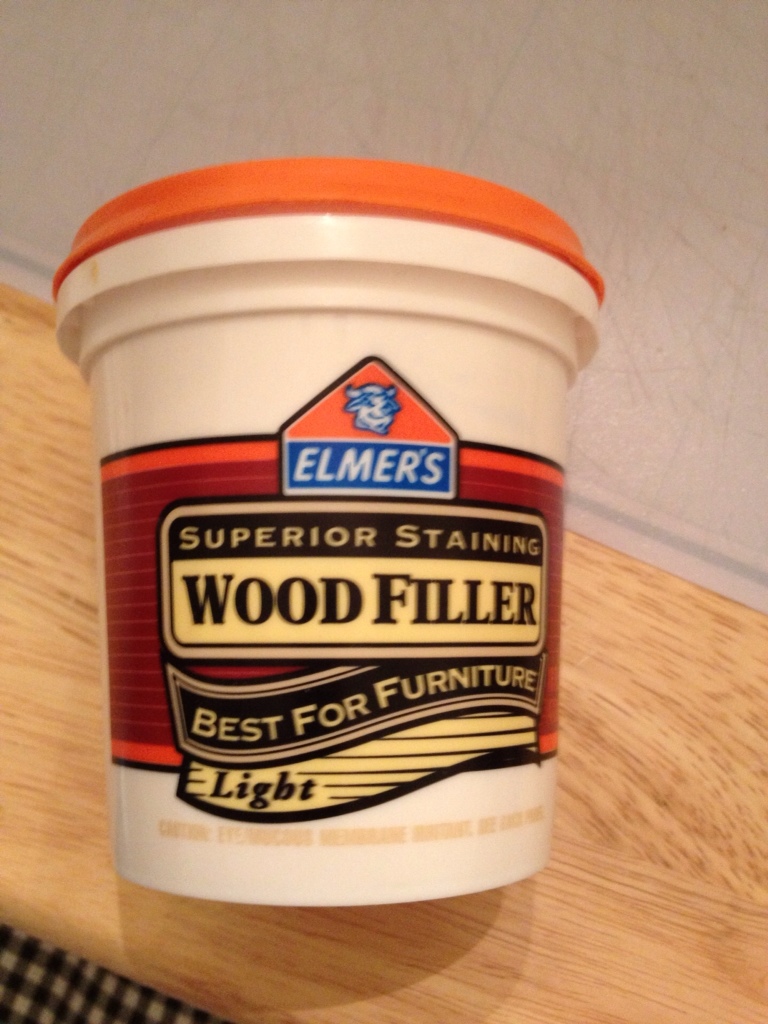
The primer not only helps prepare the rocket for the paint, it also shows any imperfections in the finish – nicks, especially deep grain, scratches, uneven fillets, and so forth – enabling you to take corrective steps. For uneven fillets, I usually add another layer of glue, smoothing it out with a damp finger. Balsa nicks and scratches, as well as many other things, are usually fixed by applying thinned Fill N Finish to the area. This Elmer’s product is indispensable in producing good looking mod rocs, so be sure you go out and buy some. In the pic above, you can see where I have applied Fill N Finish to the non-papered edges of the Rogue fins to cover the cracks and imperfections. I am also building the BMS Mini Bomarc, which is shown below. Note that I have used Fill N Finish to fix nicks and scratches in the balsa wings, as well as an edge defect at the bottom of the right wing.

After fixing the imperfections (be sure to sand the Fill N Finish smooth), apply a second coat of primer, let dry, and sand with 400 grit. The rocket should now feel as smooth as a baby’s bottom; if not, you have more priming and sanding to do (more the latter I’m afraid).

Now on Part 6 – painting.

Building Rockets, Part 4 – Putting Things Together

By Bill Cooke

After assembling the motor mounts, the next step is to mark the body tubes for the fins and launch lugs. The Estes marking guides make this easy – once you’ve decided which end of the body tube is the bottom 🙂

The v-shaped plastic widget is then used to draw the lines on the tubes:

Before I started attaching the fins to the Aero-Hi tube, I pulled out my box of Avery full sheet labels to start laminating the Rogue fins. Once again, this is simple – cut the sheet to size and press the fins down on the label paper, making sure there are no bubbles. I then placed a sheet of wax paper over the fins and let them sit under a stack of books overnight to make sure the adhesive ‘sticks’ well. Then trace around the fin with a sharp hobby knife and repeat for the other side.

Fin attachment is one of the hardest parts of rocket building for newbies (It sure was for my 10 year old self) – it needn’t be. All you have to do is to remember to use the ‘double glue’ technique, which is spelled out in the Handbook of Model Rocketry:

…when gluing porous materials such as paper or wood you coat both surfaces with a layer of glue or bonding agent and let both surfaces dry. Then coat both surfaces again and join them together. The first coat of glue on both surfaces penetrates the pores of the material. The second glue coat is then free to join with the first coat and with the second coat on the other surface. A double glue joint will be so strong that the materials will break or tear before the glue joint turns loose.

If you follow the above, you will find that the fin will grab the body tube almost instantly with the second coat, eliminating the frustrating “the darn fin fell off” situation. The strength part is also correct; I have had fins break, but never come loose from the body tube since I have used double glue joints.

It is now pretty easy to attach the fins, launch lug, and simulated conduit to the Aero-Hi:

After letting the fins dry overnight, I applied fillets of wood glue. Wood glue shrinks (as does white glue), so I use my finger to apply 3 successive glue layers to make the fillet, allowing a little time to dry between layers. This results in very nice and smooth fillets. I then did the same for the launch lug.

More in Part 5…

Building Rockets, Part 3 – Two Simple Builds

by Bill Cooke

While I very much enjoy building current kits, my real passion is perusing old catalogs and plans so that I can build the rockets that were available when I was a young geek (40 or so years ago – sigh). You can find a lot of the old catalogs here on Ninfinger’s site, and the instructions/plans are often available at JimZ’s Rocket Plans or, if he doesn’t have them, Ye Olde Rocket Plans. What you DO NOT want to do (unless you are a collector with serious bucks) is to spend a couple of hundred dollars on eBay for a kit you can easily clone for about $15.

This past Friday night, I was looking at the Estes 1973 catalog and ran across this page:

I have cloned the two in the middle (Little John and Wolverine) already, and the two on the far left – the Aero-Hi and Rogue – struck my fancy. I especially like the sounding rocket style and color scheme on the Aero-Hi. I now have the idea for my next build project, so what next? In this case, I invoke Rule 1 from Part 1 of this series, and think about the build:

  1. Are the instructions and parts list available? Yep – JimZ’s site has the plans for the Rogue and Ye Olde Rocket Plans has them for the Aero-Hi.
  2. Are the parts available? Again, yes. Go to the Semroc web site – my absolute favorite rocket vendor, btw – and click on The Classics image near the top right. Searching the list for the Aero-Hi and Rogue shows that Semroc has all the parts I need, including laser-cut fin sets (Yay!). No decals, but a quick check of the Excelsior Rocketry web site indicates that he has them – the Rogue, Little John, and Aero-Hi are all on the same sheet, saving me from having to buy 2 sets of decals.
  3. Do I have some or all of the parts? In this case, yes, including the Excelsior decals, which I purchased when I cloned the Little John.
  4. Any gotchas in the builds? Pretty straight forward 4FNC (4 fins and a nose cone) construction, with tri-color paint jobs. However, I did notice that the Rogue fins are of thin 1/16″ balsa, which have a tendency to warp when you apply sanding sealer or water-thinned Fill N Finish. Best to paper laminate them, which will solve the warping issue, and add a lot of strength to the fins.

The next steps are to print out the instructions and to gather the parts from my various bins and boxes. Shown below are the components of the Aero-Hi; you can see that I have already applied Fill N Finish (mentioned in Part 2 of this series) to the body tube seams. The old brown-colored Estes/Centuri tubes have little in the way of spirals and often require no filling; however, the new white tubes often have deep spirals, which easily show in the painted model unless filled.

 The 1st step in the instructions for both rockets call for assembling the 13 mm motor mount, which I followed, EXCEPT for cutting small notches in the forward centering rings. The BT-20 main tube is rather small in diameter, and I like to have as much room for the parachute as possible. So I am opting to forego the standard Estes tri-fold paper shock cord  mount in favor of the Quest-style mount, in which thin 100# kevlar flame resistant (but not flame proof) thread is tied around the motor mount tube and passed through the notch in the centering ring. The shock cord is then tied to the thread (see image below). An important point is that the kevlar thread should not be so long as to stick out of the body tube, else the stress of ejection could result in a “zipper”, in which the thread cuts down through the body tube like a knife.

Body tube spirals filled, motor mounts assembled. We will continue on in Part 4…

Building Rockets, Part 2 – More Tools of the Trade

by Bill Cooke

Continuing on with tools…

  • Alignment guides – In my last post, I mentioned alignment marks for fins, launch lugs, etc. When you build a kit, it usually has an alignment guide printed in the instructions which is to be cut out and wrapped around the body tube. For unusual designs like the Estes Interceptor, you still should do this; however, for most LPR 3 and 4 fin rockets there is another way. For a few bucks, you can buy a fin alignments guide set from Estes, which contains the yellow parts in the pic below:

The set has a long v-shaped piece of plastic (bottom of image), which can be used to draw fin lines on BT-50 and smaller tubes. For larger diameter tubes, I prefer the aluminum T-shape above it – you can use it to draw nice straight lines down the body tube, which beats the heck out of the “use a door frame” method mentioned in the old kit instructions. The circular plastic pieces are used to place fin marks at the bottom of the tube; just pick the one that fits and draw the marks above the lines in the plastic. Works great with 3 and 4 finned rockets!

  • Filler – For filling tube spirals, you can’t do much better than Elmer’s Fill N Finish (shown above), available at hardware stores or online. Mix it with water until you have the consistency of mustard, and apply it with a brush to the spirals. Let it dry a few hours, sand the tube with 320 grit, et voila! No more seams. You can also use it to fill the grain on balsa nose cones and fins, but I don’t use it much for this purpose as it does not harden the balsa the way sanding sealer does. I DO use it often to fix dings in balsa parts and fill gaps – can’t live without it! Fill N Finish is non-toxic and cleans up with just water, so it is good to use with kiddos around.
  • Sealer – This is the old school and stinky way to fill balsa grain. Shown below is Aero Gloss Sanding Sealer, available at local and online hobby shops. Multiple coats (4 or 5) applied with a brush to the fins or nose cone will give you a hard balsa surface with a smooth plastic-like finish unachievable by other methods. However, the fumes will kill ya, so use in a well ventilated room or outdoors. Not safe for the kids or around the wife, who will kill you for stinkin’ up her house!
  • Masking tape – Most paint schemes call for different colors on the various parts of the rocket, which means masking. Here, the choice of tape is all-important to get nice sharp lines and avoid bleeds. You do NOT want to use the blue 3M tape shown below; it was designed for house painters, not rocket builders, and makes for terrible bleeds. Some folks swear by Scotch transparent tape and have good results, provided they spray an additional coat of the base color after masking and before the final color (this helps seal the tape edges, avoiding bleeds). I use the Tamiya yellow tape at the top of the pic – it comes in different widths, conforms well to the surface, and adheres nicely. Much more expensive than Scotch tape, it is also very forgiving; I have never had a bleed using this stuff.
  • Paint – Pretty much a personal choice. I use Industrial Krylon (a laquer based paint) because it is resistant to running, dries quickly, and you can recoat anytime. Others use Rustoleum or enamels, though the latter take a LONG time to dry. Still others forego the rattle can to get spectacular results through airbrushing.

Building Rockets, Part 1 – Basic Tools of the Trade

by Bill Cooke

As time has moved along, I have gotten better at building rockets – at least in the sense of finishing and making them look good. I have gone from the classic 10 foot rocket (“rocket looks good from 10 feet away”) to 3 foot rockets, and even the occasional one foot rocket. It is a learning process, accomplished mainly through trail and error and reading the online forums (Ye Olde Rocket Forum) and blogs (Model Rocket Building by Chris Michielssen). However, the joy in turning a cardboard tube and some balsa into a flying, eye-catching rocket is a major high for me, and I’m sure you’ll like it too!
Clone of the Estes Scamp
Before I start discussing tools, there are a couple of things you absolutely need to turn out a decent model:

  • Think about the build – Even when building a kit, you need to think about how you will get to the end product. Does the body tube have spiral seams that need filling? Does it have tube fins, pods, or hard-to-get-at surfaces that may require finishing and painting before they are attached? Do you wish to replace the shock cord mount with another like the “Quest type” to free up more space for the parachute or streamer? The answers to these and other questions will determine how you proceed with the build, so it is good to resolve them up front before you are faced with a gotcha.
  • Have patience – Nothing good ever comes from rushing a model build; in fact, my biggest mistakes have come when trying to hurry a model for a launch or trying to get it finished and painted before a rain front moves in. Allow plenty of time, especially for finishing and painting, which takes far longer than the building for most LPR birds. The sun will return and there is always another launch, so don’t pressure yourself.

Building a rocket requires the right tools. Here are the ones I use, in no particular order:

  • GlueAileen’s Original Tacky Glue is what I use to attach fins; it sets up quickly and provides a strong bond. I use wood glue (Titebond) for fin fillets or wood-to-wood joints.
  • KnifeX Acto #1 knife with #11 fine point blades – is there anything else? Blades are cheap, so ensure yours is sharp by replacing it fairly frequently (How often depends on use and materials you cut).
  • Sandpaper – Various grits, all the way from 150 to 2000. I use 150 to shape plywood and dowels, 220-240 to shape basswood and balsa, 320 to smooth fins and body tubes, and 400 for smoothing the finish (sanding paint base coats). 1000/2000 grit is good for removing paint spots and tiny imperfections – you can get these from hobby shops like RC Hobbies here in town or order it online. You will not find anything finer than 400 grit at Home Depot. Have plenty of sandpaper, because you will be doing a LOT of sanding!
  • Sanding blocks – You CAN sand fins and finishes with just sandpaper in your hand, but a sanding block (small wooden block or t-shaped piece of aluminum) gives you a lot more control, especially when you are trying to put angled edges on that scale model or smooth fin surfaces (fingernails can scratch balsa easily). These are also cheap and available online and at hobby/craft stores; you can make wood ones yourself from scrap plywood if you are so inclined.
  • Tack cloths – Once you have done the actual building, you will need to keep the rocket clean while you add primer and paint, as there is some sanding in between coats. Paper towels and soft rags help to some extent, but I have found that they always leave small particles and junk that cause unsightly bumps in the paint. A tack cloth is a sticky piece of cheese cloth that will actually grab the dust and gunk as you wipe the rocket down (see pic at bottom). Available online or at Hobby Lobby or Michaels for a couple of bucks each, they are indispensable for getting a good finish!
  • Rulers – Absolutely, positively essential! I have a couple of plastic ones that I use to make measurements, and a thin metal ruler I use as a knife guide to cut fins, patterns, and decals/markings. Only way I am able to cut a straight line!

These are the basics – I have left out very obvious things like pencils and sharpies used to mark alignment lines, etc. However, a good build requires more than just the basics, especially in marking alignment lines, cutting body tubes, and filling seams and other imperfections. I’ll cover those in part 2…